> ## Documentation Index
> Fetch the complete documentation index at: https://docs.raycaster.ai/llms.txt
> Use this file to discover all available pages before exploring further.

# Quick Start Guide

> Create your first sheet in minutes

<div className="mt-2 mb-4 bg-gradient-to-r from-[#4F5DFF]/20 to-[#4F5DFF]/5 dark:from-[#4F5DFF]/20 dark:to-[#4F5DFF]/10 border-l-4 border-[#4F5DFF] rounded relative overflow-hidden">
  <div className="absolute inset-0 z-0 opacity-10" style={{backgroundImage: "url('/images/background.png')", backgroundSize: "cover", backgroundPosition: "center"}} />

  <p className="text-gray-800 dark:text-white text-sm relative z-10"><strong>Get Started Fast:</strong> Follow these steps to start using Raycaster's AI-powered workspace. You'll learn how to create sheets, populate data, and leverage AI for powerful insights.</p>
</div>

## Create Your First Sheet

<div className="my-8 bg-white dark:bg-gradient-to-br dark:from-[#161f30] dark:to-[#111827] rounded-xl p-6 border border-gray-200 dark:border-[#4F5DFF]/20 relative overflow-hidden shadow-sm">
  <div className="absolute right-0 bottom-0 w-1/2 h-1/2 opacity-10" style={{backgroundImage: "url('/images/background.png')", backgroundSize: "cover", backgroundPosition: "center"}} />

  <ol className="list-none space-y-6 relative z-10">
    <li className="relative pl-12">
      <div className="absolute left-0 top-0 bg-[#4F5DFF]/20 w-8 h-8 flex items-center justify-center rounded-full">
        <span className="text-[#4F5DFF] font-semibold">1</span>
      </div>

      <h3 className="text-lg font-semibold text-gray-900 dark:text-white">
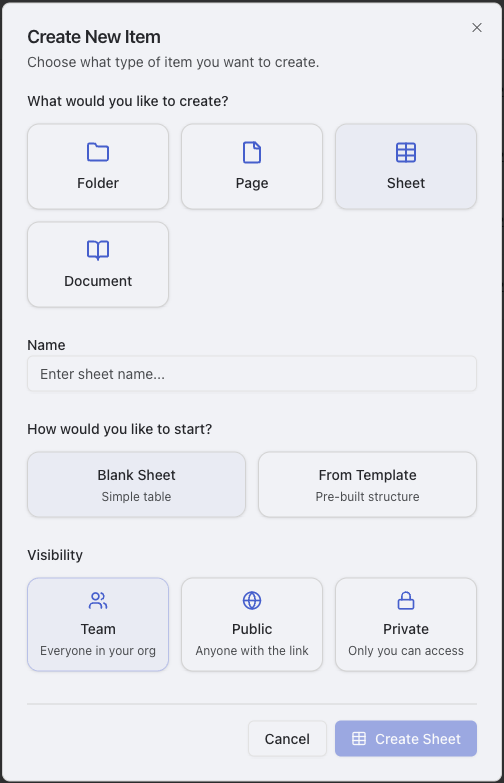
Navigate to Home & Create Sheet</h3>
      <p className="text-gray-600 dark:text-gray-300 text-sm mt-1">Select Home at the top left in the sidebar, then click the "Create" button in the top-right corner. Select "Sheet".</p>

      <Frame caption="Navigate to Home and click Create to start a new sheet">
        <img src="https://mintcdn.com/raycaster/dEhs8Du7OeRsZOdB/images/sheet-creation.png?fit=max&auto=format&n=dEhs8Du7OeRsZOdB&q=85&s=a5820cca7ce19fe8633e8344356c0392" alt="Home navigation and sheet creation dialog" width="504" height="783" data-path="images/sheet-creation.png" />
      </Frame>
    </li>

    <li className="relative pl-12">
      <div className="absolute left-0 top-0 bg-[#4F5DFF]/20 w-8 h-8 flex items-center justify-center rounded-full">
        <span className="text-[#4F5DFF] font-semibold">2</span>
      </div>

      <h3 className="text-lg font-semibold text-gray-900 dark:text-white">Name Your Sheet & Select Template</h3>
      <p className="text-gray-600 dark:text-gray-300 text-sm mt-1">Give your sheet a descriptive name, then click "From Template" and select "Default Company Research" to get started with pre-configured columns.</p>
    </li>

    <li className="relative pl-12">
      <div className="absolute left-0 top-0 bg-[#4F5DFF]/20 w-8 h-8 flex items-center justify-center rounded-full">
        <span className="text-[#4F5DFF] font-semibold">3</span>
      </div>

      <h3 className="text-lg font-semibold text-gray-900 dark:text-white">Select Visibility Settings</h3>
      <p className="text-gray-600 dark:text-gray-300 text-sm mt-1">Choose who can view and edit your sheet. You can keep it private, share with specific team members, or make it accessible to your entire organization.</p>
    </li>

    <li className="relative pl-12">
      <div className="absolute left-0 top-0 bg-[#4F5DFF]/20 w-8 h-8 flex items-center justify-center rounded-full">
        <span className="text-[#4F5DFF] font-semibold">4</span>
      </div>

      <h3 className="text-lg font-semibold text-gray-900 dark:text-white">Add Rows</h3>
      <p className="text-gray-600 dark:text-gray-300 text-sm mt-1">Click "Add Row" at the bottom of the sheet.</p>

      <Frame caption="Add row dialog with enrichment options">
        <img src="https://mintcdn.com/raycaster/NkwkAu8IAZ9zTAYr/images/add-row.png?fit=max&auto=format&n=NkwkAu8IAZ9zTAYr&q=85&s=0bb838fb939d98ac07bd34254d3b83e4" alt="Add row dialog with enrichment options" width="1409" height="127" data-path="images/add-row.png" />
      </Frame>
    </li>

    <li className="relative pl-12">
      <div className="absolute left-0 top-0 bg-[#4F5DFF]/20 w-8 h-8 flex items-center justify-center rounded-full">
        <span className="text-[#4F5DFF] font-semibold">5</span>
      </div>

      <h3 className="text-lg font-semibold text-gray-900 dark:text-white">Add Custom Research Column (Optional)</h3>
      <p className="text-gray-600 dark:text-gray-300 text-sm mt-1">Click "Add Column," name your column, select a data type, and enable the AI Research option. Use the '@' character to reference variables from other columns in your research prompts.
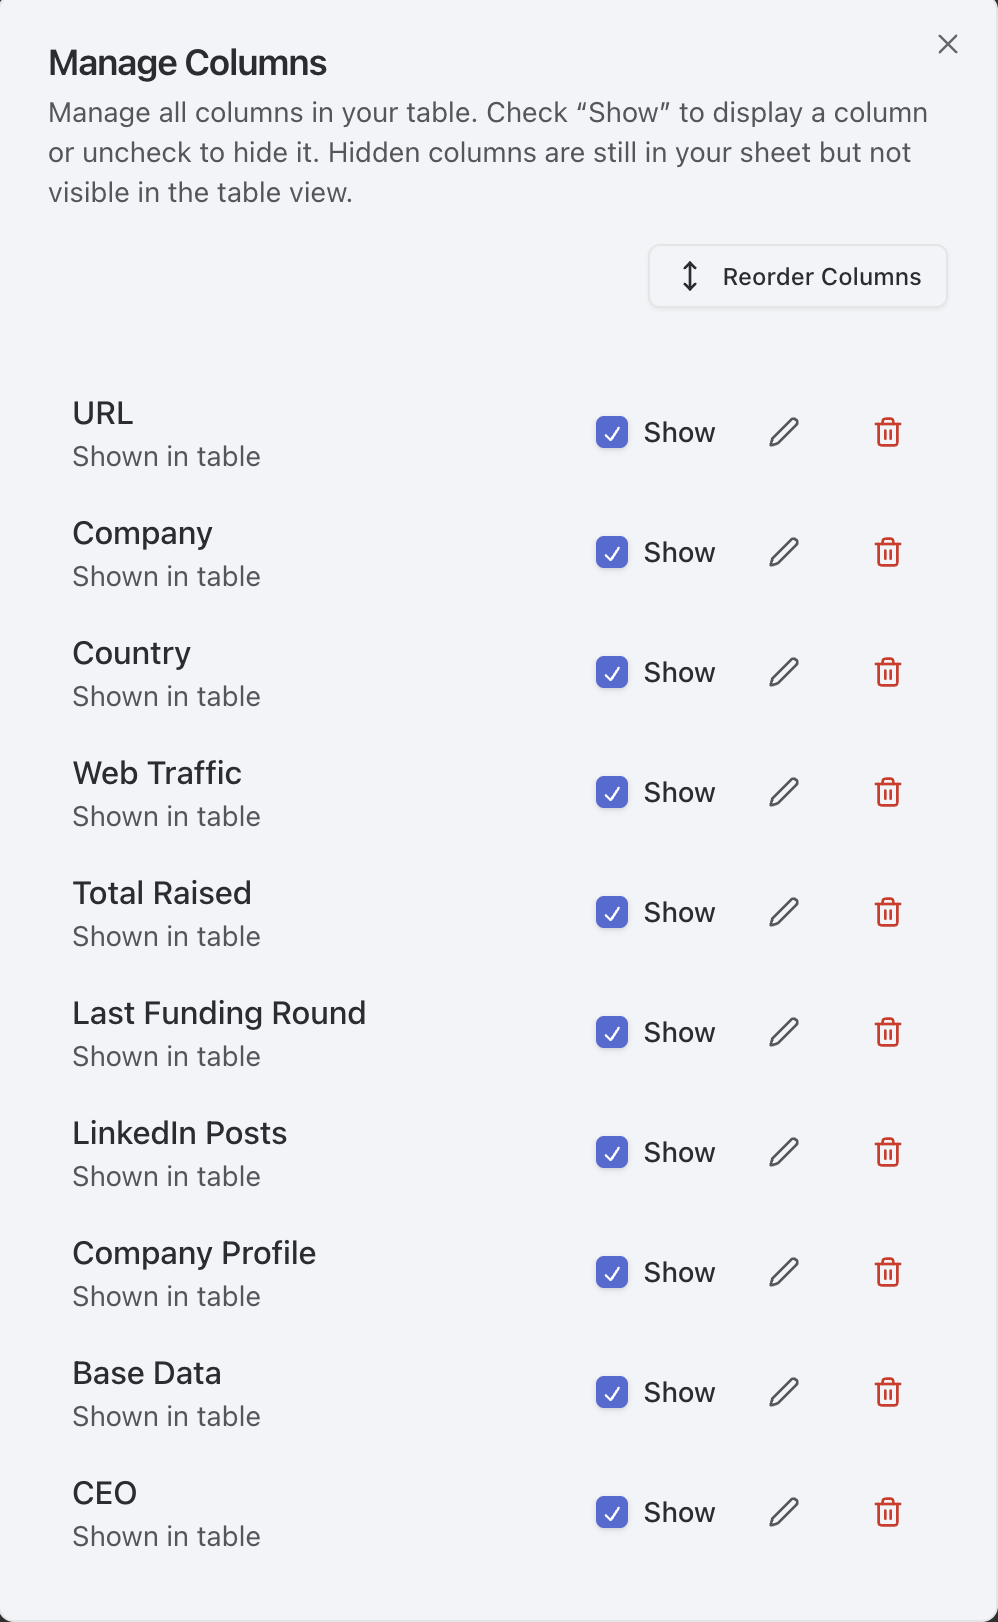
</p>

      <Frame caption="Creating a custom research column with AI capabilities">
        <img src="https://mintcdn.com/raycaster/7UelhNhIiWBOCuCS/images/manage-columns.png?fit=max&auto=format&n=7UelhNhIiWBOCuCS&q=85&s=7a672b4ad6c36692f8b3cf417a4cf910" alt="Column creation dialog with research options" width="998" height="1622" data-path="images/manage-columns.png" />
      </Frame>

      <div className="mt-4 mb-4 px-4 py-3 bg-gradient-to-r from-[#7B85FF]/20 to-[#7B85FF]/5 dark:from-[#7B85FF]/20 dark:to-[#7B85FF]/10 border-l-4 border-[#7B85FF] rounded relative overflow-hidden">
        <div className="absolute inset-0 z-0 opacity-10" style={{backgroundImage: "url('/images/background.png')", backgroundSize: "cover", backgroundPosition: "center"}} />

        <p className="text-gray-800 dark:text-white text-sm relative z-10"><strong>Pro Tip:</strong> Be specific when setting up research columns. For example, instead of "company info," try "annual revenue" or "tech stack details."</p>
      </div>
    </li>

    <li className="relative pl-12">
      <div className="absolute left-0 top-0 bg-[#4F5DFF]/20 w-8 h-8 flex items-center justify-center rounded-full">
        <span className="text-[#4F5DFF] font-semibold">6</span>
      </div>

      <h3 className="text-lg font-semibold text-gray-900 dark:text-white">Run Research & View Results</h3>
      <p className="text-gray-600 dark:text-gray-300 text-sm mt-1">Click "Run Research" to start the AI analysis. Watch as the AI automatically populates your research columns with relevant, accurate data pulled from various sources.</p>

      <Frame caption="Research execution and results display">
        <img src="https://mintcdn.com/raycaster/7UelhNhIiWBOCuCS/images/run-research.png?fit=max&auto=format&n=7UelhNhIiWBOCuCS&q=85&s=119033f9bcb803e1bc8b5b15ae0235ba" alt="Research execution interface showing progress and results" width="151" height="58" data-path="images/run-research.png" />
      </Frame>
    </li>
  </ol>
</div>

<div className="mt-4 mb-8 px-4 py-3 bg-gradient-to-r from-[#4F5DFF]/20 to-[#4F5DFF]/5 dark:from-[#4F5DFF]/20 dark:to-[#4F5DFF]/10 border-l-4 border-[#4F5DFF] rounded relative overflow-hidden">
  <div className="absolute inset-0 z-0 opacity-10" style={{backgroundImage: "url('/images/background.png')", backgroundSize: "cover", backgroundPosition: "center"}} />

  <p className="text-gray-800 dark:text-white text-sm relative z-10"><strong>Key Point:</strong> AI-powered columns will automatically update within \~2 minutes after your request is submitted.</p>
</div>

## Next Steps

<CardGroup cols={2}>
  <Card title="Learn More About Rows" icon="table-rows" href="/content-management/rows" color="#4F5DFF">
    Explore advanced row management techniques including bulk operations, data validation, and automated enrichment workflows.
  </Card>

  <Card title="Discover Column Types" icon="table-columns" href="/column-types/text" color="#7B85FF">
    Master different column types including research columns, formula columns, and data validation to build powerful data structures.
  </Card>
</CardGroup>
